In the modern web ecosystem, building a blazing-fast, secure personal portfolio or business landing page shouldn't require a monthly subscription. The secret to a truly zero-cost web architecture lies in combining two of the most developer-friendly platforms available: Porkbun for transparent, unbeatable domain pricing, and GitHub Pages for enterprise-grade, completely free static hosting backed by a global CDN. This guide walks you through every step — from DNS theory to a live, HTTPS-secured website — with nothing left out.
While legacy registrars lure you with $1 first-year deals only to lock you into $20+ renewals, Porkbun has become the go-to registrar for developers who value honesty: flat renewal pricing, free WHOIS privacy on every domain, and free SSL certificates included by default. Pair that with GitHub Pages — which serves your static site from Microsoft's global infrastructure at zero cost — and you have an architecture that rivals setups costing $200/year.
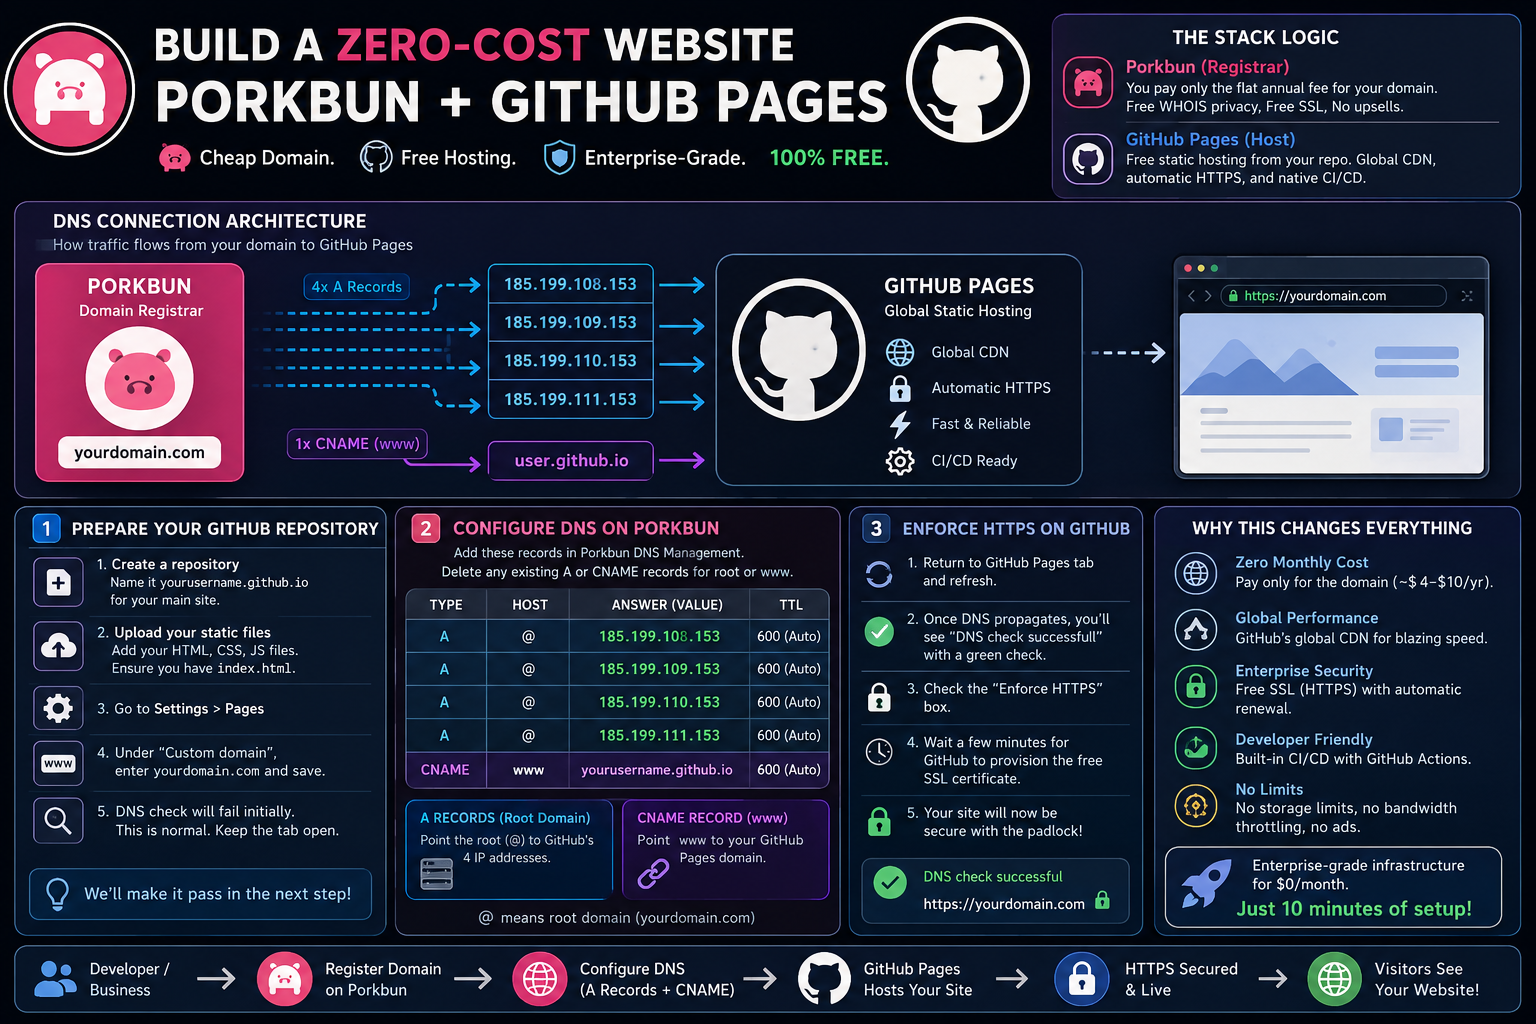
The Tech Stack Logic
The Registrar (Porkbun): You pay one flat annual fee for your domain — typically $4–$10 depending on the TLD. No upsells, no hidden renewal hikes, no "domain privacy" add-on fees. Porkbun bundles WHOIS privacy and SSL for free on every domain.
The Host (GitHub Pages): GitHub serves your static files directly from your repository using a global CDN. It includes automatic HTTPS via Let's Encrypt, 1 GB storage, 100 GB monthly bandwidth, and native CI/CD through GitHub Actions — all at $0/month.
The Result: An enterprise-grade web presence — custom domain, HTTPS, CDN, CI/CD — for the cost of a domain renewal once a year. Total recurring monthly cost: $0.00.
Before You Begin: Prerequisites Checklist
Before touching any settings, make sure you have these three things ready. This will make the entire process take about 10–15 minutes instead of an hour of troubleshooting.
- A GitHub account — free at
github.com. Your username matters here: your default GitHub Pages URL will beyourusername.github.io. - A domain purchased on Porkbun — registered at
porkbun.com. Any TLD works:.com,.dev,.io,.me, etc. - Your static website files — at minimum, an
index.htmlfile. This can be a hand-coded HTML page, a static export from React/Next.js/Nuxt, or a site generated by Jekyll or Hugo. GitHub Pages does not run server-side code (no Node.js, PHP, or Python backends).
User Site vs. Project Site — Know the Difference
User/Organization site: Repository named exactly yourusername.github.io. Content at root of main branch. Accessible at yourusername.github.io. Best for personal portfolios and main websites.
Project site: Any other repository name (e.g., my-portfolio). Accessible at yourusername.github.io/my-portfolio. Custom domains work the same way on both. Best for project documentation or secondary sites.
Visualizing the DNS Connection Architecture
Before diving into the steps, it's crucial to understand what we are actually doing. The Domain Name System (DNS) is the internet's phonebook. When someone types your domain into a browser, their device queries DNS to find which server to connect to. We are editing that phonebook entry inside Porkbun — telling it to point your domain to GitHub's four IP addresses for the root domain, and to your GitHub Pages URL for the www subdomain.
DNS Routing Flow: Porkbun → GitHub Pages
How traffic is directed from your custom domain to your GitHub repository via 4 A Records (root domain) and 1 CNAME (www subdomain).
Step 1: Prepare Your GitHub Repository
The destination must be set up before you redirect traffic there. Follow these steps precisely.
1a. Create Your Repository
- Go to
github.com, click the + icon at the top-right, and select New repository. - For your main personal website, name it exactly:
yourusername.github.io— replacingyourusernamewith your actual GitHub username. This is the magic name that activates user-level Pages. - Set visibility to Public (required for free GitHub Pages).
- Click Create repository.
1b. Upload Your Site Files
- Upload your site files to the root of the repository. You must have at minimum an
index.htmlfile — this is what GitHub serves as your homepage. - If you're using a framework like React, push your build output (the
/distor/outfolder contents), not your source files. Raw JSX does not run on GitHub Pages. - Commit your files to the
mainbranch.
1c. Enable GitHub Pages
- Navigate to your repository on GitHub. Click the Settings tab (gear icon).
- In the left sidebar, scroll down and click Pages.
- Under Build and deployment, set Source to Deploy from a branch.
- Set Branch to
mainand folder to/ (root). Click Save. - GitHub will now build and deploy your site. After 1–2 minutes, you'll see a banner: "Your site is live at https://yourusername.github.io". Visit that URL to confirm your site loads correctly before proceeding.
1d. Add Your Custom Domain to GitHub Pages
- Still in Settings > Pages, scroll to the Custom domain section.
- Type your Porkbun domain (e.g.,
yourdomain.com) and click Save. - GitHub will attempt a DNS verification check. It will fail immediately — this is completely expected because we haven't configured Porkbun yet. Keep this tab open.
- Notice that GitHub has now automatically created a file called
CNAMEin your repository root. This file contains your custom domain name and is essential — never delete it. If you ever rebuild your site from scratch, recreate this file manually with just your domain name as its content (e.g.,yourdomain.com).
The CNAME File — Critical Detail Often Missed
The CNAME file (no extension) in your repository root tells GitHub Pages which custom domain to respond to. Its contents should be just your domain, one line:
yourdomain.com
If you use a static site generator or a CI/CD pipeline that wipes your repo on every build, add this file to your source so it gets included in every deployment automatically.
Step 2: Configure DNS Records on Porkbun
Open a new tab and log into your Porkbun account. This is where we point your domain to GitHub's servers. The entire configuration requires exactly five DNS records: four A records for the root domain (@), and one CNAME record for the www subdomain.
2a. Open the DNS Management Panel
- From your Porkbun dashboard, hover over your domain and click the DNS button (it looks like a world icon or a list icon next to your domain name).
- You'll land on the DNS Management page. Scroll down to the Current Records section.
- Delete any pre-existing A or CNAME records for the root (
@) orwwwthat you didn't add yourself. Porkbun often pre-populates parking page records — these will cause conflicts. Click the red trash icon to remove them. Leave MX (email) records untouched if you have them.
The 5 Required DNS Records
Enter these exact records into Porkbun's DNS Management area. The @ symbol represents your root domain. In Porkbun's interface, leave the Host field blank (empty = root).
2b. Add the Four A Records
- In the Add Record section at the top of the DNS panel, select Type: A — Address record.
- Leave the Host field completely empty. In Porkbun, an empty host field defaults to the root domain (
@). Do not type@— leave it blank. - In the Answer field, paste:
185.199.108.153 - Leave TTL at default (600). Click Add.
- Repeat steps 1–4 for the remaining three IPs:
185.199.109.153,185.199.110.153, and185.199.111.153.
You should now see four A records in the Current Records table, all pointing to @ with different IPs. Why four? GitHub maintains multiple servers for redundancy. Your browser will use whichever responds fastest.
2c. Add the CNAME Record for www
- Select Type: CNAME — Canonical name record.
- In the Host field, type:
www - In the Answer field, type your GitHub Pages base URL:
yourusername.github.io(nohttps://, no trailing slash). - Click Add.
This record ensures that visitors who type www.yourdomain.com are also routed to your site correctly. Without it, the www version would return a DNS error.
DNS Propagation — Expect Up to 24 Hours
DNS changes are not instantaneous. Once you save records in Porkbun, those records need to propagate to DNS resolvers (essentially: caches at your ISP and around the world) before GitHub can verify them.
Porkbun is exceptionally fast — in practice, propagation often takes 5–30 minutes. But globally, it can take up to 24 hours. Don't panic if GitHub's DNS check still shows an error an hour after saving. Check your propagation status at dnschecker.org.
Step 3: Verify DNS & Enforce HTTPS on GitHub
Return to the GitHub Pages tab (Settings > Pages) and click Refresh periodically until you see the DNS check pass.
- Once DNS has propagated, GitHub will show a green checkmark and the message "DNS check successful" next to your custom domain.
- Immediately below the domain input, you'll see a checkbox labeled Enforce HTTPS. It may be greyed out for a few minutes while GitHub provisions your free TLS certificate via Let's Encrypt. Wait until it becomes clickable.
- Check the Enforce HTTPS box. This permanently redirects all HTTP requests to HTTPS and activates the padlock icon in visitors' browsers. Never skip this step — HTTP sites are flagged as "Not Secure" by Chrome and Firefox.
- Wait 2–5 minutes for the certificate to provision. Then visit
https://yourdomain.comin a new tab. You should see your site, served securely.
Verify via Command Line (Optional but Satisfying)
Open your terminal and run these commands to confirm DNS is resolving correctly:
dig yourdomain.com +noall +answer
# Should return the 4 GitHub IPs (185.199.x.153)

dig www.yourdomain.com +noall +answer
# Should return a CNAME pointing to yourusername.github.io
Step 4: Protect Your Domain with GitHub's Domain Verification
This optional but highly recommended step prevents another GitHub user from claiming your custom domain on their repository while your DNS records are active. Without verification, a bad actor could briefly hijack traffic to your domain by pointing it at their Pages site.
- Go to GitHub Settings (your profile icon → Settings) → Pages → Add a domain.
- Enter your custom domain and click Add domain. GitHub will provide you a unique TXT record value.
- Go back to Porkbun DNS Management. Add a new TXT record: Host =
_github-pages-challenge-yourusername, Answer = the value GitHub gave you. - Return to GitHub and click Verify. Once verified, your domain shows a purple badge — it is now exclusively linked to your account.
Troubleshooting Common Issues
If something isn't working, run down this checklist before spending an hour searching Stack Overflow.
- DNS check still failing after 24 hours: Double-check your A records in Porkbun — make sure the Host field is truly blank (not
@). Confirm you deleted any conflicting pre-existing A or CNAME records for the root. Also verify the CNAME file exists in your repo root with the correct domain. - "Enforce HTTPS" is greyed out and stays greyed: The TLS certificate from Let's Encrypt requires that DNS is correctly resolving first. Try removing the custom domain from GitHub Pages settings, saving, then re-adding it. This restarts the certificate provisioning process. If your DNS is propagating correctly, the certificate typically arrives within 15–30 minutes.
- Site loads at
yourdomain.combut notwww.yourdomain.com: Your CNAME record forwwwis likely missing or incorrect. Double-check it in Porkbun. The CNAME Answer should be exactlyyourusername.github.io— no protocol, no trailing dot, no slash. - 404 — There isn't a GitHub Pages site here: This means the CNAME file in your repository is missing or contains the wrong domain. Check your repo root for a file named exactly
CNAME(no extension) containing just your domain name on one line. - Mixed content warnings in browser console: Your HTML is referencing resources (images, scripts, fonts) over HTTP instead of HTTPS. Find all
http://URLs in your code and change them tohttps://or protocol-relative//. - Changes to your site aren't showing up: GitHub Pages typically rebuilds within 1–2 minutes of a push. Check the Actions tab in your repository to see if the deployment workflow completed successfully. Hard-refresh your browser with
Ctrl+Shift+Rto bypass local cache.
Pro Tips: Getting the Most Out of This Stack
- Automate deployments with GitHub Actions: If you use a static site generator (Jekyll, Hugo, Astro, Next.js static export), add a GitHub Actions workflow to auto-build and deploy on every push to
main. GitHub provides free minutes for public repositories. Your site rebuilds and goes live automatically within ~60 seconds of a git push. - Custom 404 page: Add a
404.htmlfile to your repository root. GitHub Pages will automatically serve it for any URL that doesn't match a file in your repo — much better than the default GitHub error page. - Use
.devor.iofor a developer brand: Porkbun's.devdomains start at ~$10/year and are exclusively HTTPS-only (enforced at the registry level). Perfect for portfolios..iodomains ($30–$40/year) carry a strong developer ecosystem connotation. - Add a sitemap and robots.txt for SEO: GitHub Pages serves static files directly, so drop a
sitemap.xmlandrobots.txtin your repository root. Google will crawl them automatically. This is exactly equivalent to what paid hosting platforms charge extra for in "SEO tools." - Email forwarding via Porkbun: Porkbun offers free basic email forwarding. You can receive mail at
hello@yourdomain.comforwarded to your personal inbox — giving you a professional email address for free with no additional setup.
The Real Cost Breakdown
Let's be precise about what you're actually paying — and what you're not.
Conclusion: Why This Changes Everything
For independent developers, freelance designers, small businesses, nonprofits, or open-source projects, the Porkbun + GitHub Pages combination is a genuine architectural game-changer. You bypass restrictive storage limits, bandwidth throttling, and the upsell banners endemic to "free" hosting tiers. You get a setup with better uptime, faster global delivery, and more deployment flexibility than most paid shared hosting plans.
The total technical investment is: 10–15 minutes of your time, five DNS records, and one annual domain renewal. In return, you get an enterprise-grade web presence with a custom domain, HTTPS, a global CDN, version-controlled deployments, and automatic CI/CD — for the price of a couple of cups of coffee per year.
#Porkbun #GitHubPages #ZeroCostHosting #DNSConfiguration #WebArchitecture #Tutorial #FrontendDevelopment #StaticHosting #CustomDomain #HTTPS
References & Official Documentation
GitHub. Configuring a custom domain for your GitHub Pages site. Official documentation covering DNS record setup, custom domain verification, and HTTPS enforcement. Available at docs.github.com/en/pages/configuring-a-custom-domain-for-your-github-pages-site.
GitHub. Managing a custom domain for your GitHub Pages site — Apex domain configuration. Specifies the four required A record IPs (185.199.108–111.153) for root domain pointing and explains why four are required for GitHub's redundant infrastructure.
Porkbun. Official DNS Help Documentation and Knowledge Base. Explains how Porkbun's DNS interface works, including how empty Host fields map to the root domain (@), and how to manage record types. Available at kb.porkbun.com.
Let's Encrypt. How It Works. Background on the free, automated certificate authority that powers HTTPS enforcement on GitHub Pages. Understanding this helps when troubleshooting certificate provisioning delays. Available at letsencrypt.org/how-it-works.